I just bought a pack of japanese paper clay at POPULAR on Friday and was so eager to try it. But it actually got me rather disappointed. It was hard to shape and the texture of the paper pulp was rather odd to work with. Maybe its just me.
But I wouldn't say its bad. It probably just gives really different effect. Make the food look very rustic.
Another problem was that I couldn't tint the paper clay. I had to paint it after shaping it. Tinting it make it dry almost immediately, for some odd reason.
But from my experiments, I would say that paper clay is good for making breads and figurines. I'm still in the process of making azuzephre's pon and zi :DD
Saturday, 7 May 2011
Clay Figurines :)
This is a "chibi-fied" version of sungmin from super junior, my first figurine order. I made ryeowook, yesung, eyunhuk and shindoong as well. (hope I got the names right)
Wondering if it would be good to make the entire super junior since the k-pop madness is hanging around now :P
Available for sale : Eyunhyuk, Shindoong, (Might make Donghae next. Hmm..)
$4 each - with or without magnet :D
Wondering if it would be good to make the entire super junior since the k-pop madness is hanging around now :P
Available for sale : Eyunhyuk, Shindoong, (Might make Donghae next. Hmm..)
$4 each - with or without magnet :D
Thursday, 5 May 2011
Mother's day special Part 2
Choclolates!
Here are just 4 of the many little chocolates I made, Gonna glue them to a wooden board or ice cream stick and add a magnet to the back of it :) May also make a "boxed" version.
Pictures will be up ASAP.
These items are not only for mothers day and will be available at any other time :):)
Anyway, the strawberry cookies I made in the baking scenes in my earlier posts is also for sale :)
Chocolate on coloured icecream stick magnet - $4
Chocolate on wooden board magnet - $5
Here are just 4 of the many little chocolates I made, Gonna glue them to a wooden board or ice cream stick and add a magnet to the back of it :) May also make a "boxed" version.
Pictures will be up ASAP.
These items are not only for mothers day and will be available at any other time :):)
Anyway, the strawberry cookies I made in the baking scenes in my earlier posts is also for sale :)
Chocolate on coloured icecream stick magnet - $4
Chocolate on wooden board magnet - $5
Mother's day specials!
Mother's day is around the corner! I've made a little charlotte cake for my mum :) Its pretty special since its my first try at a charlotte cake :D
If you want this as a gift for your mum, I'm willing to make them by today and get them ready for collection by tomorrow.
More mother's day specials to be coming up today(hopefully). I know this is a little late. I'll be sure to do the father's day specials at least a week or two in advance.
The strawberry canes were readymade and bought from mdm ang, I'll make my own and post once I master the skinner shade technique :)
Strawberry Charlotte cake: $5
If you want this as a gift for your mum, I'm willing to make them by today and get them ready for collection by tomorrow.
More mother's day specials to be coming up today(hopefully). I know this is a little late. I'll be sure to do the father's day specials at least a week or two in advance.
The strawberry canes were readymade and bought from mdm ang, I'll make my own and post once I master the skinner shade technique :)
Strawberry Charlotte cake: $5
Wednesday, 4 May 2011
Breakfast
Mm..just had a breakfast of a beancurd tart. Sounds wierd but it actually tastes kinda nice. Should be preparing for school now so this will be a short one.
This is a plate of a typical/traditional english breakfast. Left out the baked beans though. I brushed everything except the scone with a very very thin layer of glaze to make it look slightly oily.
The scones can be repaced with bagel or toast etc. This is solely out of my imagination so I will try one using a reference picture soon.
Mini breakfast set A*** $4.50
This is a plate of a typical/traditional english breakfast. Left out the baked beans though. I brushed everything except the scone with a very very thin layer of glaze to make it look slightly oily.
The scones can be repaced with bagel or toast etc. This is solely out of my imagination so I will try one using a reference picture soon.
Mini breakfast set A*** $4.50
Whipped cream madness!
Recently, I've been trying to find more economical ways to make fake whipped cream. As a student, I don't have that much to spend on materials and its kinda bad to ask for any more money to buy materials. Thats why I have to sell my creations in order to get more money to get more materials :D teehee.
But anyway, back to the topic, here in Singapore, ready made whipped cream like decogel or fuwafuwa whipped cream can cause around $25 for a small tube.
Therefore, I set out to find alternatives to make whipped cream. I tried making my own piping bag and use it to pipe fuwafuwa normal ADC but failed quite miseribly. I also tried acryllic paint. I thought it worked but then ran out of it. Then, I tried mixing sculpy with liquid sculpy but it ended up a messy thing.
In the end, I resorted to the mold method. It worked ok but did not produce the best results. However, before that, I "consulted" Mdm Ang and she showed me how to make a whip cream dollop using tweezers. Still practicing that though.
If I do have success with the whipped cream, I will definitely post the pictures :)
But anyway, back to the topic, here in Singapore, ready made whipped cream like decogel or fuwafuwa whipped cream can cause around $25 for a small tube.
Therefore, I set out to find alternatives to make whipped cream. I tried making my own piping bag and use it to pipe fuwafuwa normal ADC but failed quite miseribly. I also tried acryllic paint. I thought it worked but then ran out of it. Then, I tried mixing sculpy with liquid sculpy but it ended up a messy thing.
In the end, I resorted to the mold method. It worked ok but did not produce the best results. However, before that, I "consulted" Mdm Ang and she showed me how to make a whip cream dollop using tweezers. Still practicing that though.
If I do have success with the whipped cream, I will definitely post the pictures :)
Basic loaf of bread tutorial
Here is the tutorial to make a basic loaf of bread. Its not too hard to do :) I had a video but I had problems uploading it so I did a photo tutorial instead. Hope this is helpful .
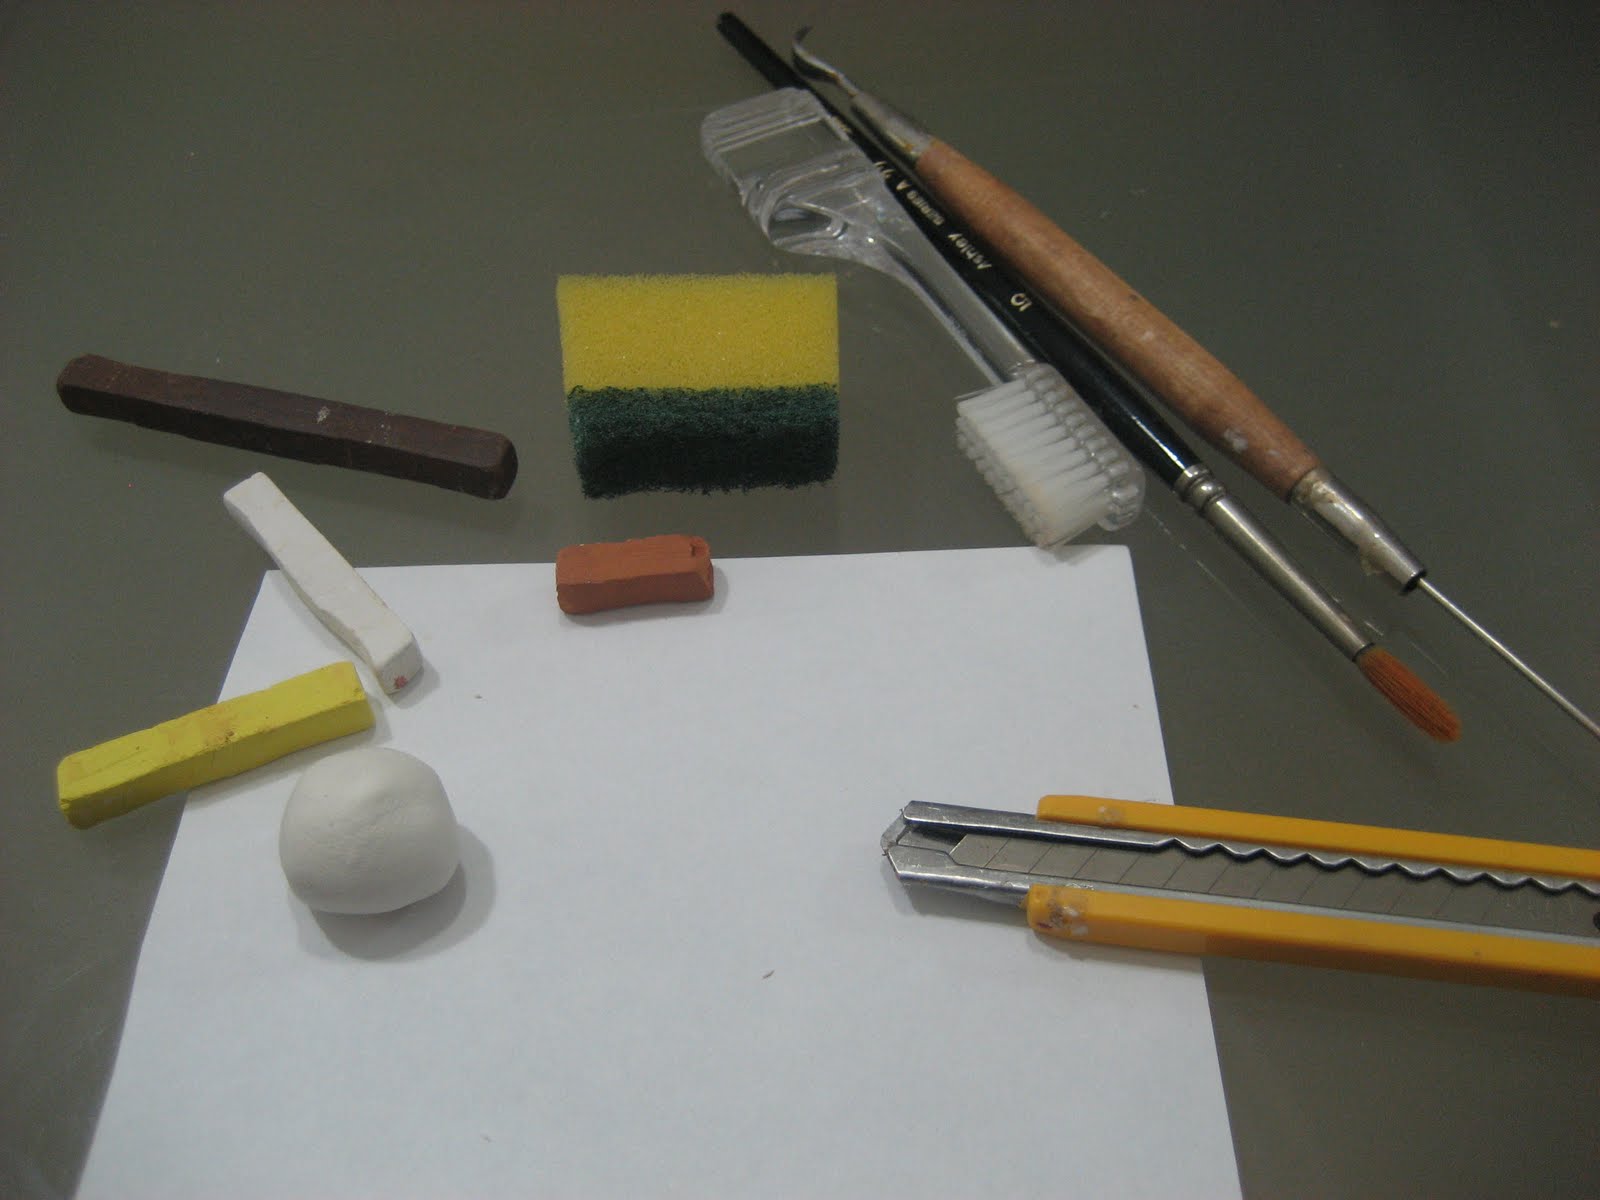
Here are the tools you will probably need: yellow, white, light brown and dark brown chalk pastles, an old toothbrush, a sponge with a "scratchy" side, a brush, a needle tool and a penknife/blade/craft knife, and a piece of paper
Knead some translucent clay and white clay together in a ratio of about 1:2
Press the two "long sides" of the bread near the bottom gently to create a bread shape.
Rub the chalk pastles on a piece of paper.

Texture the bread on all sides using your toothbrush,

Enhance the texture using the "scratchy" side of the sponge.

Start to brush on the colours to give the bread a baked effect. Start with the lightest colour but be careful not to apply too much yellow.
Brush the darker brown only on the top of the bread -- since it is more likely to burn at the top :)
You may also add a tinge at the corners :)
At the end, it should look something like this.
Then, cover it and pop it in the freezer for about 10 minutes. Then, using your knife, cut about two slices out of the loaf. Do not use a sawing motion to cut as "jaggs" will appear on the bread.


Texture the white portions of the bread.

Then, use a needle tool to make air holes of varied sizes on the white portions of the bread.

Add some finishing touches to your loaf of bread.

There you have it! A little loaf of bread :D
Here are the tools you will probably need: yellow, white, light brown and dark brown chalk pastles, an old toothbrush, a sponge with a "scratchy" side, a brush, a needle tool and a penknife/blade/craft knife, and a piece of paper
Knead some translucent clay and white clay together in a ratio of about 1:2
Press the two "long sides" of the bread near the bottom gently to create a bread shape.
Rub the chalk pastles on a piece of paper.
Texture the bread on all sides using your toothbrush,
Enhance the texture using the "scratchy" side of the sponge.
Start to brush on the colours to give the bread a baked effect. Start with the lightest colour but be careful not to apply too much yellow.
Brush the darker brown only on the top of the bread -- since it is more likely to burn at the top :)
You may also add a tinge at the corners :)
At the end, it should look something like this.
Then, cover it and pop it in the freezer for about 10 minutes. Then, using your knife, cut about two slices out of the loaf. Do not use a sawing motion to cut as "jaggs" will appear on the bread.
Texture the white portions of the bread.
Then, use a needle tool to make air holes of varied sizes on the white portions of the bread.
Add some finishing touches to your loaf of bread.
There you have it! A little loaf of bread :D
Subscribe to:
Posts (Atom)