Hello! Have not been updating for quite long :( I was busy studying for tests and preparing for my robotics competition :) I'm so proud of my school's robotics team :D and even prouder to be part of it :)
Anyway, I have just put up part 1 of my bread tutorial and feel free to watch! and please do like or suscribe :)
http://www.youtube.com/watch?v=RZV2BC0WJgU
Sunday, 29 May 2011
Friday, 20 May 2011
Kueh Bahulu and Pandan Chiffon Cake

 Similarly, the chiffon cake had a really nice texture, although I am not yet completely satisfied with it. I have yet to browm the outsides of the chiffon cake though.
ADC rice

Wednesday, 18 May 2011
Donut Madness!

I don't actually plan on putting icing on them, maybe just sugar cause the icing will probably hide the grooves.
These are not dollhouse scale.


ADC donuts(1st picture) on a board with magnet**
$4
Dollhouse scale donuts on a plate(3rd picture)**
$3.50
Taiyaki

I made this out of air dry clay and it produces a great "cakey" texure. I cut open this one after I baked it but perphaps it will look even more soft and fluffy if I tore it open before it dries.
Taikayi on a plate(whole/torn open)***- $3.50
With magnet: additional $1
Taiyaki in plastic bag/paper bag* - $3
Waffles


NEW PACKAGING:D

Here is another of my orders sitting atop my new packaging boxes :) Typical orders will be safely kept in these boxes.

I will be posting more decoden soon :)
Decoden packaging can be requested at $2.50
Monday, 16 May 2011
Daiso ADC

The result are rather satisfying and I'm quite happy with the overall effect.
Marshmallow charm (hp strap)**** $3
With chocolate** $3.50

1st attempt at Decoden!

Finally got the whipped cream right. True enough, whipped cream was the key to success.
Its not perfect but I'm pretty happy with the results. The cookies and ice cream were homemade but the canes were ready made.
I can offer a new packaging service for decoden and the little box in the picture is up for sale for $4.50 but I'm working to make better ones :D
Just went "shopping" over the weekends to get stuff to help me manage the orders :) In the process of making more 'suju" chibis right now, so the foodies have got to wait. At the same time, I'm preparing for a competition on "gentleman bunny's" channel on youtube.
And YET, at the same time, its been rather busy and still is at school. Hopefully things will slow down a bit once the mid-year vacations come.
Wednesday, 11 May 2011
Cookie monster

COOKIIEE.. ARMnomnomnomnom!
Apart from elmo, cookie monster has always been my favourite seasame street character.
Due to copyright issues,cookie monster cupcake is not for sale :(
Monday, 9 May 2011

Saturday, 7 May 2011
Experiment with paper clay

But I wouldn't say its bad. It probably just gives really different effect. Make the food look very rustic.
Another problem was that I couldn't tint the paper clay. I had to paint it after shaping it. Tinting it make it dry almost immediately, for some odd reason.
But from my experiments, I would say that paper clay is good for making breads and figurines. I'm still in the process of making azuzephre's pon and zi :DD
Clay Figurines :)

Wondering if it would be good to make the entire super junior since the k-pop madness is hanging around now :P
Available for sale : Eyunhyuk, Shindoong, (Might make Donghae next. Hmm..)
$4 each - with or without magnet :D
Thursday, 5 May 2011
Mother's day special Part 2

Here are just 4 of the many little chocolates I made, Gonna glue them to a wooden board or ice cream stick and add a magnet to the back of it :) May also make a "boxed" version.
Pictures will be up ASAP.
These items are not only for mothers day and will be available at any other time :):)
Anyway, the strawberry cookies I made in the baking scenes in my earlier posts is also for sale :)
Chocolate on coloured icecream stick magnet - $4
Chocolate on wooden board magnet - $5
Mother's day specials!
Mother's day is around the corner! I've made a little charlotte cake for my mum :) Its pretty special since its my first try at a charlotte cake :D
 If you want this as a gift for your mum, I'm willing to make them by today and get them ready for collection by tomorrow.
More mother's day specials to be coming up today(hopefully). I know this is a little late. I'll be sure to do the father's day specials at least a week or two in advance.
The strawberry canes were readymade and bought from mdm ang, I'll make my own and post once I master the skinner shade technique :)
Strawberry Charlotte cake: $5
Wednesday, 4 May 2011
Breakfast

This is a plate of a typical/traditional english breakfast. Left out the baked beans though. I brushed everything except the scone with a very very thin layer of glaze to make it look slightly oily.
The scones can be repaced with bagel or toast etc. This is solely out of my imagination so I will try one using a reference picture soon.
Mini breakfast set A*** $4.50
Whipped cream madness!
Recently, I've been trying to find more economical ways to make fake whipped cream. As a student, I don't have that much to spend on materials and its kinda bad to ask for any more money to buy materials. Thats why I have to sell my creations in order to get more money to get more materials :D teehee.
But anyway, back to the topic, here in Singapore, ready made whipped cream like decogel or fuwafuwa whipped cream can cause around $25 for a small tube.
Therefore, I set out to find alternatives to make whipped cream. I tried making my own piping bag and use it to pipe fuwafuwa normal ADC but failed quite miseribly. I also tried acryllic paint. I thought it worked but then ran out of it. Then, I tried mixing sculpy with liquid sculpy but it ended up a messy thing.
In the end, I resorted to the mold method. It worked ok but did not produce the best results. However, before that, I "consulted" Mdm Ang and she showed me how to make a whip cream dollop using tweezers. Still practicing that though.
If I do have success with the whipped cream, I will definitely post the pictures :)
Basic loaf of bread tutorial
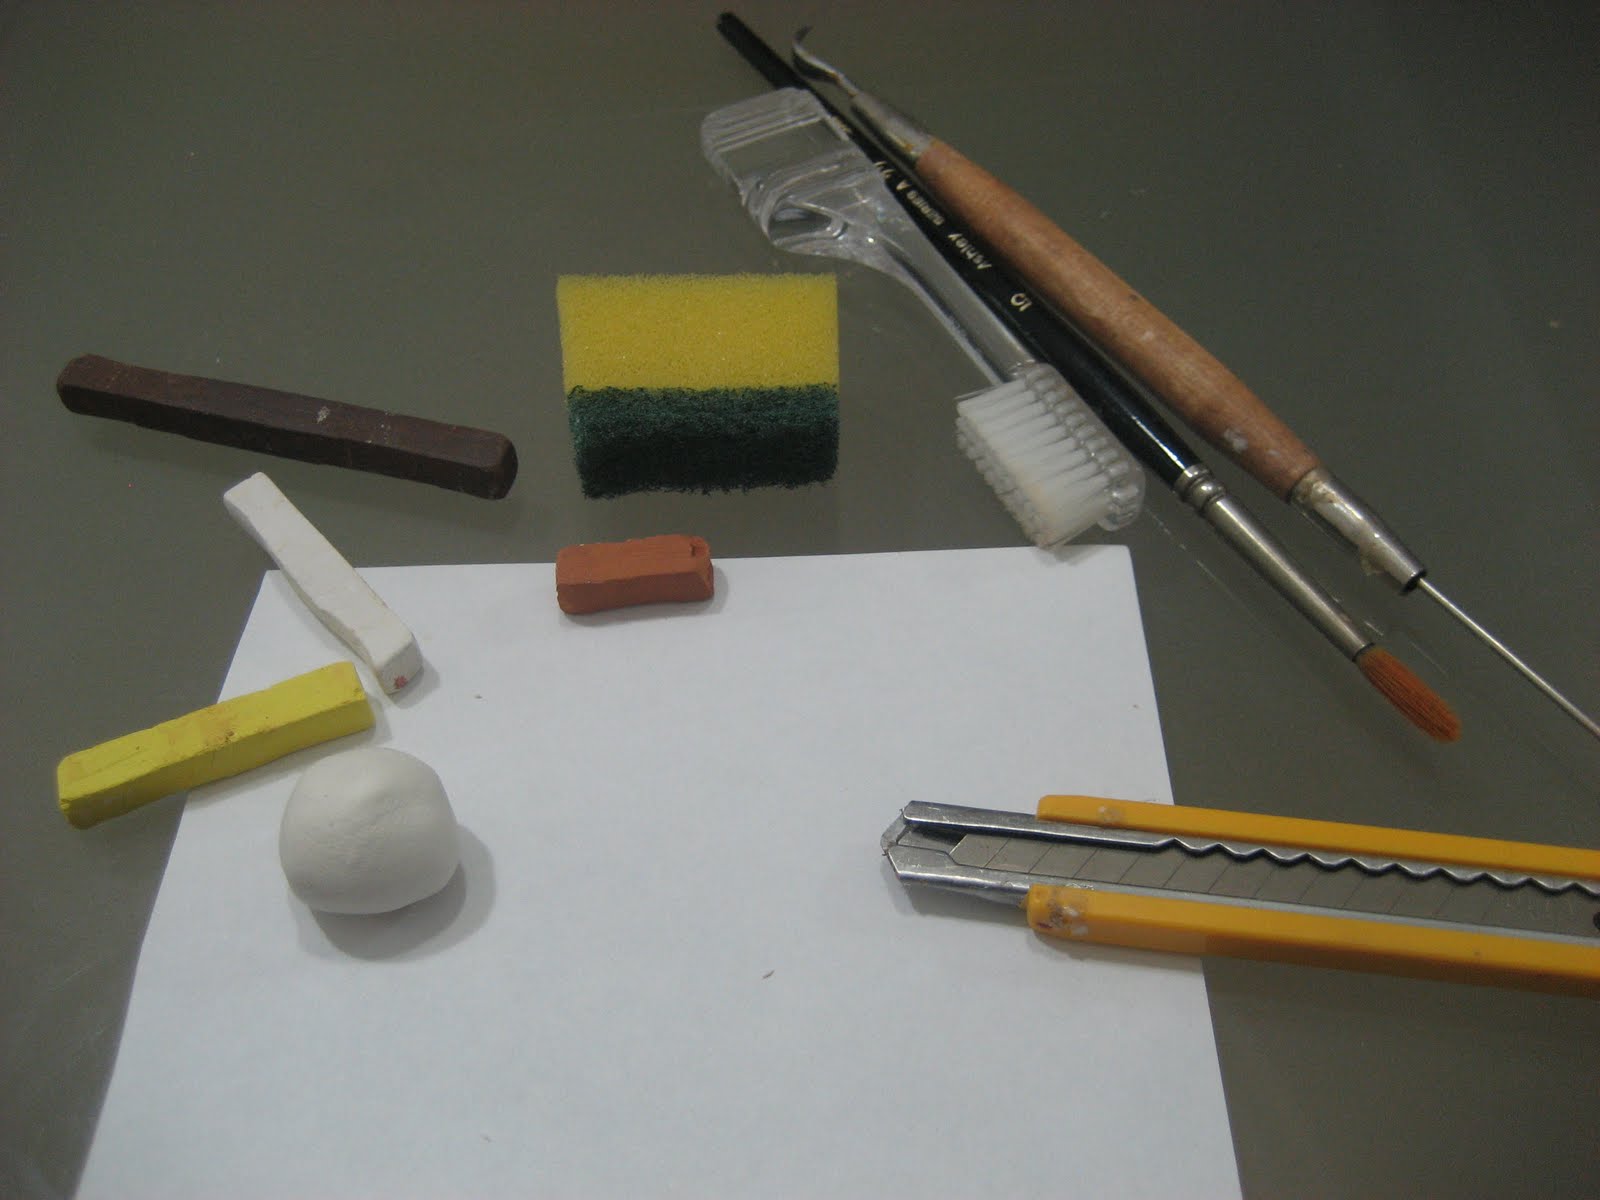

Here are the tools you will probably need: yellow, white, light brown and dark brown chalk pastles, an old toothbrush, a sponge with a "scratchy" side, a brush, a needle tool and a penknife/blade/craft knife, and a piece of paper
Knead some translucent clay and white clay together in a ratio of about 1:2
 Shape the clay into a squarish log shape.


Texture the bread on all sides using your toothbrush,

Enhance the texture using the "scratchy" side of the sponge.

Start to brush on the colours to give the bread a baked effect. Start with the lightest colour but be careful not to apply too much yellow.

You may also add a tinge at the corners :)


Then, cover it and pop it in the freezer for about 10 minutes. Then, using your knife, cut about two slices out of the loaf. Do not use a sawing motion to cut as "jaggs" will appear on the bread.


Texture the white portions of the bread.

Then, use a needle tool to make air holes of varied sizes on the white portions of the bread.

Add some finishing touches to your loaf of bread.

There you have it! A little loaf of bread :D

Tuesday, 3 May 2011
About food prep scenes

Today was a really lonnnnnnnngggggggg day at school. Both litterally and metaphorically. So I decided to write a quick post. Mini stuff always cheers me up :)
Anyway, back to the point, here are some of the pictures of my attempted baking scenes. The more recent one is the cupcake one at the bottom.
The setup for the cookies only require really basic materials - clay, liquid clay, acryllics, mini bowls, flour and a board. The paper bag, metal tray and heart shaped cutters were homemade.
The cupcakes one required more materials, which i got from my rement display set, which i got as a gift.
The chocolate, muffins/cupcakes were self-made while the sugar is simulated by craft sand.
 |


Today was a really lonnnnnnnngggggggg day at school. Both litterally and metaphorically. So I decided to write a quick post. Mini stuff always cheers me up :)
Anyway, back to the point, here are some of the pictures of my attempted baking scenes. The more recent one is the cupcake one at the bottom.
 Anyway, back to the point, here are some of the pictures of my attempted baking scenes. The more recent one is the cupcake one at the bottom.
The setup for the cookies only require really basic materials - clay, liquid clay, acryllics, mini bowls, flour and a board. The paper bag, metal tray and heart shaped cutters were homemade.
The cupcakes one required more materials, which i got from my rement display set, which i got as a gift.
The chocolate, muffins/cupcakes were self-made while the sugar is simulated by craft sand.
Sunday, 1 May 2011
Chicken with vegetables

The carrots were cut from one of my successful carrot cane, which is a fairly easy cane since it is only a circle within a circle.
The colour of the chicken is also created using chalk pastles. The gravy, which looks kinda faint is resin tinted with brown acryllic.
Was thinking about putting on cherry tomatoes but looks like it slipped my mind :)
Ice cream and waffles


Pancakes!

The pancake texture is made using the bread texture technique. The syrup is resin. The strawberry cane is ready made. Still working on my caning skills, but still not having much success yet. So far, I have only managed the banana and carrot cane.
The resin is mixed with a tiny really teeny amount of yellow and orange acryllic. Too much will make it loose its translucency. The ideal form of dye is well, resin dye but glass tint should work too.
Plate of pancake with strawberry slices - $4.50
Addition of cutlery- Addition of $2
(sorry about the high price of the cutlery, since it is imported, the price tends to be a little high)
Sugar donuts

Sugar donuts are a lot easier to make that iced/forsted donuts. The sugar is magnificently simulated by craft sand. I got my craft sand from Mdm. Ang and I think that was her last pack. I have yet to find out where else in Singapore craft sand is sold. Art stores should hold it, might do a little "research" during the next school holudays.
Plate of sugar donuts(above) - $3.50
Plate of sugar donuts magnet - $4.50
Ice cream :)

I initially thought that patting the sandpaper was supposed to give it the desired texture but turns out that rubbing the sandpaper did the trick.
I am not sure if I would be able to pull of this technique in dollhouse scale but would get to some experimenting soon. I would also be making a cone for this one and turn it into a magnet perhaps. Photos of the completed product to follow!
Subscribe to:
Posts (Atom)